



How to identify a radiator core with blocked cooling passages
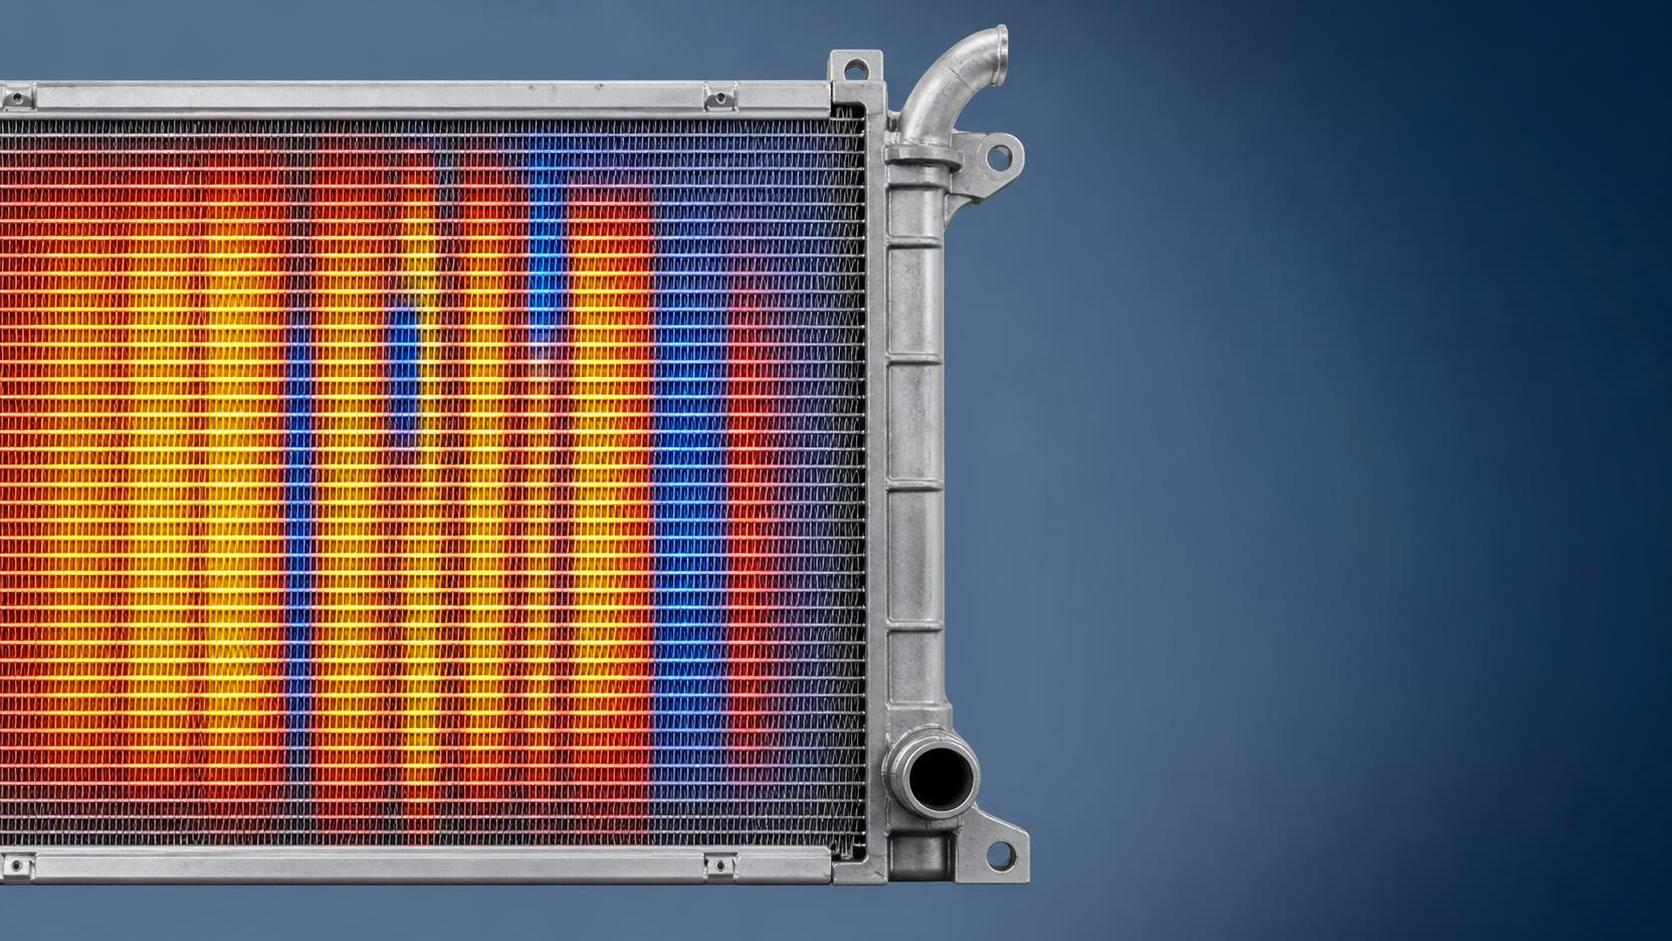
A blocked radiator core can quietly reduce cooling efficiency, trigger overheating, and shorten the service life of heavy-duty engines. Recognizing early signs—such as uneven temperature readings, restricted coolant flow, and persistent overheating—helps prevent costly downtime. The important point is that a restriction inside the core is not always visible from the outside, and not every overheating complaint is evidence of an internally blocked radiator.
Accurate diagnosis requires separating coolant-side blockage from external airflow restriction, thermostat faults, water-pump problems, fan-control issues, head-gasket leakage, and incorrect coolant filling. Replacing a radiator before this distinction is made may solve nothing while adding unnecessary cost. Conversely, continuing to flush a severely restricted core can delay a necessary replacement and expose the engine to repeated thermal stress.
What “blocked cooling passages” actually means
A radiator core transfers heat by sending hot coolant through many small tubes while air passes across fins bonded to those tubes. A blocked passage is a restriction in the coolant circuit within the tubes, headers, or localized areas of the core. It reduces the amount of coolant that can travel through part of the heat exchanger.
Internal restrictions usually develop from one or more of the following conditions:
- Corrosion products created by neglected, depleted, or incompatible coolant;
- Mineral deposits from hard water or poor-quality make-up water;
- Silicate gel, precipitated additives, or mixed coolant chemistries;
- Rust and casting sand released from the engine block or cylinder head;
- Oil contamination caused by a failed oil cooler or engine defect;
- Stop-leak compounds that settle in narrow radiator tubes;
- Debris from deteriorated hoses, seals, or previous component failures.
The result is rarely a perfectly uniform reduction in capacity. More often, some tube sections remain active while others become partly or fully obstructed. This produces a recognizable thermal pattern: the radiator has hot zones that receive coolant and cooler zones that receive little or no coolant. That unevenness is usually more diagnostically useful than an isolated dashboard temperature reading.
Begin with the operating complaint, not the radiator
The service history often provides the first clue. A radiator core blockage is more likely where an engine previously suffered coolant contamination, repeated overheating, corrosion in the expansion tank, use of tap water, or frequent top-ups with unknown coolant. It is also common after a vehicle has been stored for long periods or after an engine repair where the cooling system was not thoroughly cleaned before being returned to service.
Typical complaints include overheating under load, temperature rise on long grades, poor temperature recovery after a hard pull, heater performance that changes with engine speed, and a system that appears acceptable at idle but overheats at road speed. A partially blocked core may allow enough cooling during light operation to conceal the problem until high ambient temperatures, full payload, towing, or sustained engine load expose the loss of reserve capacity.
However, an overheating engine at idle with normal highway temperature more often points toward insufficient airflow, a weak viscous fan clutch, an electric fan issue, fan shroud damage, or condenser/radiator fin blockage. Internal coolant restrictions should not be assumed simply because the radiator is old.
Read the temperature pattern across the core
An infrared thermometer or thermal imaging camera is one of the most practical tools for identifying a blocked radiator core. The engine must be at normal operating temperature, the thermostat must be open, and the cooling system must be safely pressurized and circulating. Never remove a pressure cap from a hot system.
With the engine stabilized, scan the radiator face in a grid pattern, ideally from the inlet side to the outlet side and from top to bottom. On many conventional crossflow systems, coolant enters one tank, moves through horizontal tubes, and exits through the opposite tank. Downflow designs use upper and lower tanks. The expected direction of temperature change depends on the radiator configuration, so identify the inlet and outlet before drawing conclusions.
A healthy core generally shows a gradual, reasonably consistent temperature decline as coolant travels toward the outlet. The exact temperature difference varies with load, thermostat setting, airflow, ambient temperature, and fan operation; there is no universal “correct” number that applies to every vehicle. What matters is consistency. A large, sharply defined cold patch surrounded by much hotter areas indicates that coolant is not flowing through that section as intended.
Several cautions matter when interpreting thermal scans:
- Measure the tube area, not only the tanks. Tanks can mask localized core restrictions.
- Shiny bare aluminum surfaces can give misleading infrared readings. Use appropriate emissivity settings or place small pieces of matte tape at test points where safe and practical.
- Compare readings under the same operating condition. A scan taken immediately after thermostat opening may differ from one taken after a loaded road test.
- A cold section can also result from poor airflow distribution, especially where a fan shroud is missing or an auxiliary condenser blocks the front face.
- Check both sides if access permits. A surface pattern alone is evidence, not a final verdict.
A thermal camera is faster and reveals patterns clearly, but a properly used contact probe or infrared thermometer can still identify suspicious areas. For a repeatable workshop record, note ambient temperature, engine speed, whether the fan was engaged, coolant temperature at the engine outlet, and the approximate location of cold zones.
Check coolant flow without creating new faults
Restricted flow can sometimes be confirmed by observing coolant movement, but the method depends on the system design. On vehicles with an accessible expansion tank or degas bottle, visible return flow may indicate that the water pump is moving coolant. It does not prove that every radiator tube is open. A strong return stream can coexist with a partially blocked core because coolant will favor the remaining open passages.
A more useful comparison is radiator inlet versus outlet temperature under controlled load. If the inlet is extremely hot while the outlet remains unexpectedly cool and the core scan shows cold bands, internal restriction becomes more likely. If both inlet and outlet temperatures are high with little temperature drop, the problem may be insufficient airflow, excessive engine heat generation, or a thermostat that is not opening correctly. These observations need to be interpreted together rather than used as a single pass/fail test.
Where workshop procedures and vehicle design permit, a coolant flow test after radiator removal can provide stronger evidence. The radiator should be drained and flushed in a controlled environment. Flow from the inlet to the outlet should be even, and resistance should not be excessive. A visibly uneven discharge pattern, delayed flow from certain sections, or debris repeatedly released during reverse flushing supports the diagnosis of a restricted core.
Do not use uncontrolled high-pressure water or compressed air on an assembled radiator. Modern aluminum cores use thin tubes and delicate fin structures. Excessive pressure can balloon tubes, separate joints, deform fins, or create leaks that were not present before testing. Use the radiator manufacturer’s approved test pressure and service instructions where available.
Differentiate internal blockage from external fin blockage
Both faults reduce cooling, but they leave different clues. External blockage occurs when dirt, insects, chaff, road debris, mud, oil film, or damaged fins prevent air from passing through the stack. It is especially common in construction equipment, agricultural operations, refuse vehicles, and heavy trucks operating in dusty environments.
An externally blocked radiator may show high overall core temperatures because hot coolant is reaching the tubes but heat cannot leave efficiently. The fins may be packed with debris, and airflow may be weak behind the radiator. In stacked cooling packages, the obstruction may be in the air-conditioning condenser, charge-air cooler, hydraulic oil cooler, or another heat exchanger mounted ahead of the radiator. Looking only at the visible front surface can miss debris trapped between units.
By contrast, an internal blockage often creates distinct cooler strips or islands on the coolant-flow side of the core. The exterior may look clean and the fan may operate normally, yet cooling capacity remains reduced. In real service, both problems can exist simultaneously: an aging core can have internal deposits while the external fin pack is contaminated. This is why cleaning fins alone is not a reliable response to chronic overheating.
Rule out the faults that imitate a blocked core
A systematic diagnosis protects against misidentification. Before condemning the radiator core, check coolant level and air bleeding, pressure cap condition, thermostat operation, drive belt condition, water-pump impeller integrity, fan engagement, fan-control sensors, shroud fitment, and lower hose collapse under speed. Verify that the correct coolant formulation is present and that the coolant concentration is appropriate for the application.
Combustion-gas intrusion also deserves attention. A leaking head gasket, cracked cylinder head, or related engine fault can pressurize the cooling system, force coolant out, produce repeated air pockets, and cause overheating that resembles poor radiator performance. A suitable combustion-leak test, pressure test, and review of coolant loss history can prevent a radiator from being blamed for an engine-side problem.
Likewise, an incorrect replacement radiator may have the right mounting points but insufficient tube count, core thickness, fin density, or cooling capacity for the vehicle’s engine and duty cycle. This is particularly relevant in commercial fleets where multiple engine ratings or transmission options share similar bodywork. When replacing a unit, confirm the original equipment number, tank arrangement, hose position, mounting geometry, transmission or oil-cooler connections, and heat-rejection requirement rather than relying only on the vehicle’s visual appearance.
For applications requiring a replacement unit, catalogs such as MERCEDES-BENZ radiator listings should be treated as a starting point for fitment verification, not as proof that every model variant uses the same core specification.
When flushing is justified—and when it is not
Flushing is appropriate when deposits are light, the core retains reasonably even temperature distribution, coolant contamination has been identified early, and there is no evidence of widespread tube closure. A proper flush is not simply adding a chemical to the expansion tank and running the engine. The system must be drained, cleaned using a chemical compatible with the metals and seals involved, thoroughly rinsed, and refilled with the specified coolant and demineralized water where required.
Any flush should include the engine block, heater circuit, reservoir, and hoses as appropriate. Cleaning only the radiator can be temporary if corrosion products remain in the engine. Afterward, the technician should confirm thermostat operation, pressure integrity, heater output, and stable operating temperature under real load.
Replacement is usually the more defensible option when thermal imaging shows extensive dead sections, reverse flushing produces persistent debris, coolant flow remains poor after cleaning, tubes are internally corroded, or the radiator has leaks and reduced capacity at the same time. In heavily worked trucks and construction machinery, a core that has lost a substantial portion of its active tube area may no longer provide enough reserve capacity even if a flush delivers a short-term improvement.
Core repair or re-coring can be viable for certain serviceable designs, particularly where the tanks and frame remain sound and an equivalent replacement is unavailable. For many modern brazed aluminum radiators, however, replacement is more practical than attempting to restore internal passages. The decision should include downtime, warranty exposure, operating duty, and the likelihood that contamination has damaged other cooling-system components.
Prevent the next blockage before returning the vehicle to service
A replacement radiator core can fail prematurely if the cause of contamination is left in the system. Before installation, identify whether the old coolant contained rust, oil, sealant residue, gasket material, or incompatible additives. Inspect the expansion tank and small bleed lines, because restrictions in these parts can create filling and air-lock problems that complicate later diagnosis.
Use coolant that meets the vehicle or engine manufacturer’s required specification, avoid mixing coolant technologies unless compatibility is confirmed, and maintain the prescribed concentration. Tap water can introduce minerals that form deposits over time, especially in high-temperature duty cycles. Service intervals should reflect actual operating conditions rather than calendar assumptions alone; dusty sites, long idling periods, heavy loads, and frequent temperature cycling all increase cooling-system stress.
A blocked radiator core is best identified through a pattern of evidence: load-related overheating, an uneven temperature map, restricted flow, contamination history, and elimination of competing faults. The most valuable workshop habit is not replacing the radiator at the first sign of high temperature, but documenting how coolant and heat move through the entire system. That approach reduces repeat repairs and helps ensure that the chosen remedy—cleaning, repair, or replacement—matches the actual failure mode.